
This article will cover how to apply textures to a shape and how to upload custom textures into your Texture Catalogue.
How to apply textures
- Using the Draw Tool, draw a desired shape.
Please see the "Drawing Tools" article and video for help drawing shapes.
- Left click on the shape to bring up the editing panel on the left side of the screen.
- Left click on one of the 4 stock textures in the middle of the panel (in the "Pattern" section). OR

- Scroll to the very bottom of the editing panel to find custom textures (in the "Textures" section). See below for instructions on how to upload custom textures.
- Click on the Select Group drop down and click on the appropriate option for the desired textures.
- Click on the Select Sub group drop down and select the appropriate option for the desired textures.
- Left click on the desired texture.

- Click on any other texture to swap.
Please note that at this time, it is not possible to remove an applied texture. Delete and then redraw a shape to remove a texture entirely and/or to create a blank shape canvas.
How to upload custom textures
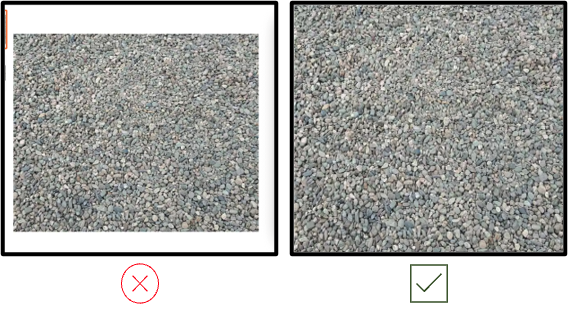
- First, ensure you have an image of the desired texture easily accessible in your computer files.
Crop out all undesired borders so only the texture is visible in the image file.
- To access the Admin section Click on your name on the top right of the screen.
- Select Admin from the options.
- Click on Texture Catalogue in the green panel on the left side of the screen.

- Click on the grey Stacked Dots icon at the top right of the table and then on Add Materials.

- Click on the green Pencil icon in the grey box visible in the editing panel on the right side of the screen.
- Find the image of the desired texture in your computer files and double click to add it to the editing panel.

- Enter information in the text fields. Name, Brand, Texture Set, Price, and UOM are all required fields.
An "NA" entry for Brand and a $0 entry for Price are acceptable to save the texture.
Typing "$" in the Price field will generate an error when trying to save the texture. Enter the numerical value only, and the system will automatically generate the associated "$"
- Click on the Groupings Tab to the left of the editing panel.

- Add a label in the Texture Group and Texture Sub Group fields and press Save.
The label used in the Texture Set field in the Vital Info tab MUST be identical to the label used in the Texture Group field in the Groupings Tab. The system will generate an error if labels are different. 